To build a mount for an Alpine Screwdriver Antenna and mount it.
Mount Vehicle: 1997 GMC Pickup with a Tall Fiberglass Camper shell.

Project:
To build a mount for an Alpine Screwdriver
Antenna and mount it.
Mount Vehicle: 1997 GMC Pickup with a Tall Fiberglass Camper shell.

THE NEED:
Good Strong Sturdy Mount
Quickly Removable/ReMountable
No Way for the Mount Fall off
Must have a way to Protect Coax and 12Volt wires when Antenna is not mounted.
THE DECISION PROCESS:
I decided that I did not want to use the trailer receiver for the
antenna mount, because I constantly pull some type of trailer.
I needed the mount to be out of the way, but still have a good location for
the antenna..
I decided to come off of the drivers side of the pickup truck, in the rear,
off of the left side of the Reeese trailer hitch.
It already has a good frame mount and ground, and is plenty sturdy enough to
handle a nice antenna. I just have to get the arm out from under the truck to
the proper location and then up vertical where I need to be to get below the
13' fully extended height, but above the side of the truck bed and a bit up
on the side of the Fiberglass camper top.
It has to be quickly and easily removed, and secure and stable during operation,
because when I travel, I get where I am going. .
With the quick disconnect feature, I need to have a place to keep the coax and
power/ground wires for the screwdriver to keep the cables in decent shape and
not throw mud and salt all over them.
I also need to be able to clean and keep the mount area in good conductive condition,
since it will be removable and not fixed which will create some problems due
to the clearance, etc..
The arm should not be overly heavy, and I hope to be able to protect the truck,
in case someone backs into the mount in a parking lot or something.. Not sure
about this one.
Ok.. The Reesed Hitch inside diameter was about 3-1/8" in diameter. Plenty
large enough to accept some 3" square tubing without any trouble. It was
raining, or had just stopped every time I went to work on this thing. I forgot
to take a picture of the hitch before I started.
I need to reduce this down to a 2-1/2" Square Tube receiver that will take
a 2" square light weight tubing which will be the mount for the antenna.
I want to be able to remove/install it quickly, and guarantee that it will not
come off while driving down the road.
I need a passivity locking mechanism and a way to use it without having problems.
Something to fix the position when the mount is installed, so I hit the locking
mechanism every time without fooling around.
I will also have to reinforce the light weight tubing to be able to lock the
mount in place without damaging it.
So, here we go>
THE ACTUAL BUILD:
First, I made the 2" x 2" x 1/8" Square Tubing that the antenna
would finally mount on. I designed the end that goes into the receiver first.
This will require a little extra work.
Note: 2x2 Square tubing is 2" outside diameter. It will be going into a
2-1/2" x 2-1/2" x 1/4" Square tubing, so it will have to be tooled
down a smidgen to insert easily, and not get hung. Depending on the accuracy
of the manufacturer of the Square tubing, this could be done quickly, or take
a few extra minutes with a grinder disk and flap disk follow-up. In this case,
both pieces were not made by the same manufacturer, so I had a little extra
work to do.
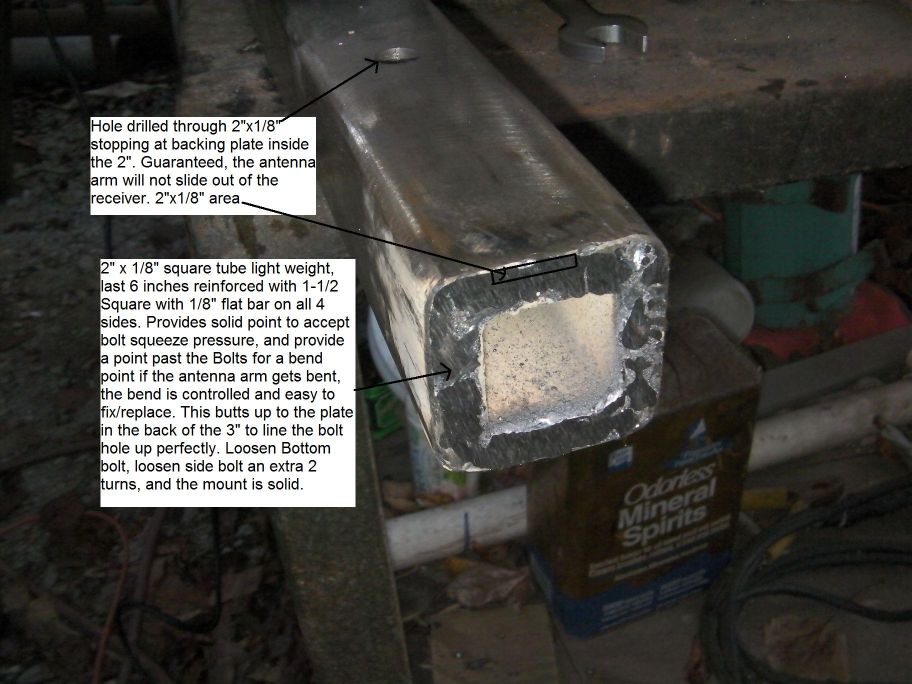
The Inside diameter of the 2"x2"x1/8" is 1-3/4". The edges
of the inside are rounded, so, they are a little smaller than the dimensions
expected.
Now to build the Inside Strongback for the 2" plate.
I took a 1-1/2 x 1-1/2 x 1/8" Square tubing and laid 1/8" Flat bar
on all four sides and welded it up. After all four pieces were welded, I rounded
the edges until I got a good snug fit.
Before I put it in, I measured and drilled two holes. One in the 2x2 thin wall
tubing, and one in the 2-1/2 x2-1/2 inch thick wall tubing. This will later
allow me to weld a nut on the 2-1/2 tubing, and on the 2" tubing, I will
have a drilled depression to accept the 1/2" Grade 8 bolt to hold the antenna
in place. Then, I will drill another hole in the 2-1/2" tubing on the next
side over that will press directly on the 2" square tubing.
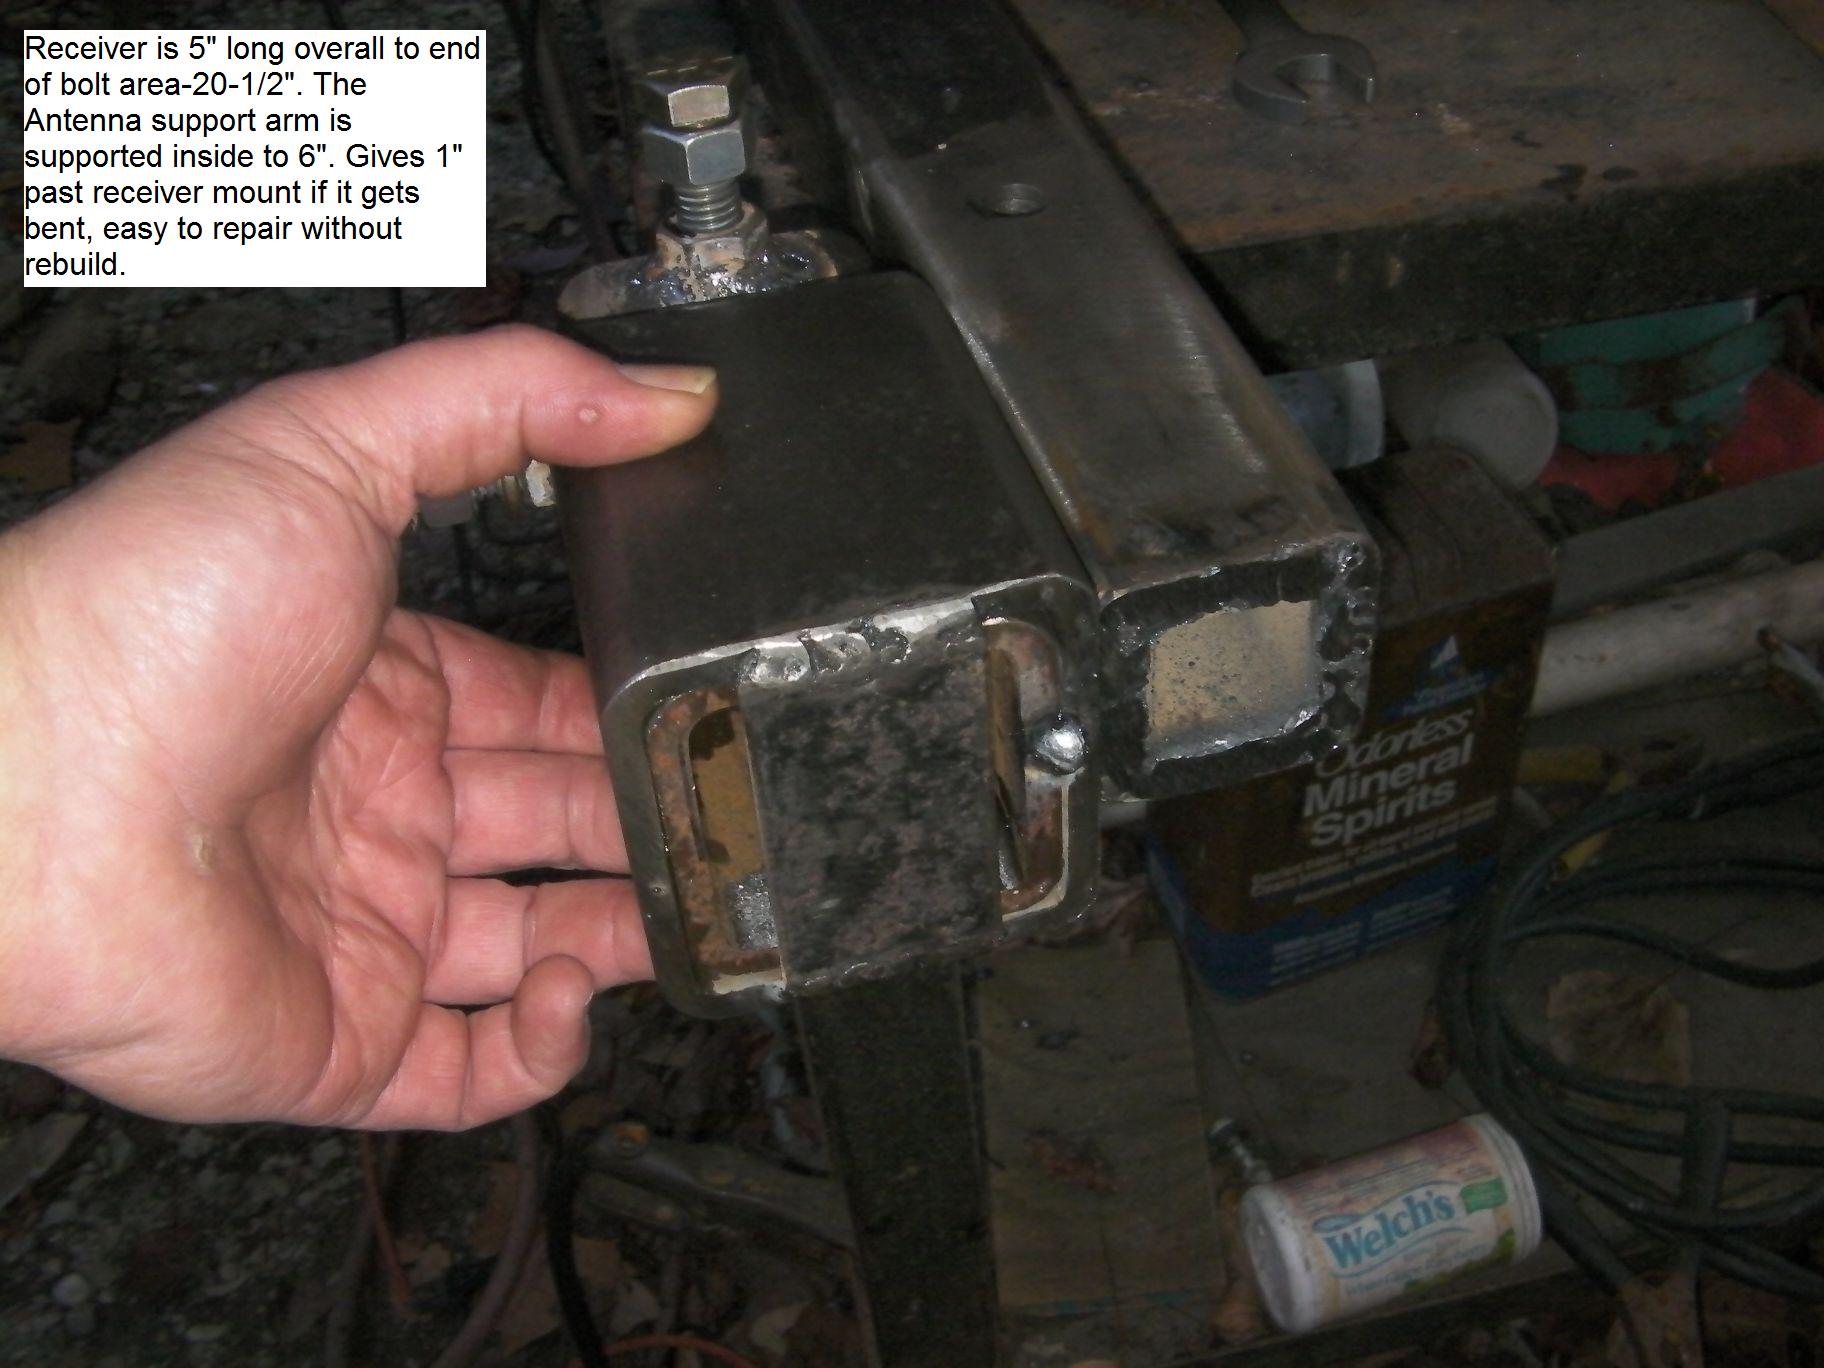
Note: The Insert was made 1" longer than the 2-1/2" square tubing,
in case this thing ever gets bent, it will bend outside of the receiver by 1",
that will make it easy to remove and repair.
Now, I need to drive the Inside Strongback that I welded and tooled
down into the 2x2 thin wall tubing.
I drove the piece into the end of the 2x2x1/8" thin wall tubing and welded
the end solid. Now, I have a place to drop the Grade 8 bold into the 2"
tubing, but stop at the Strongback
There is no way that this will ever come out accidentally.
Here is a picture of the end of the 2" tubing to be inserted into the receiver.
Now, I built the receiver that will go into the Reesed hitch on the truck.
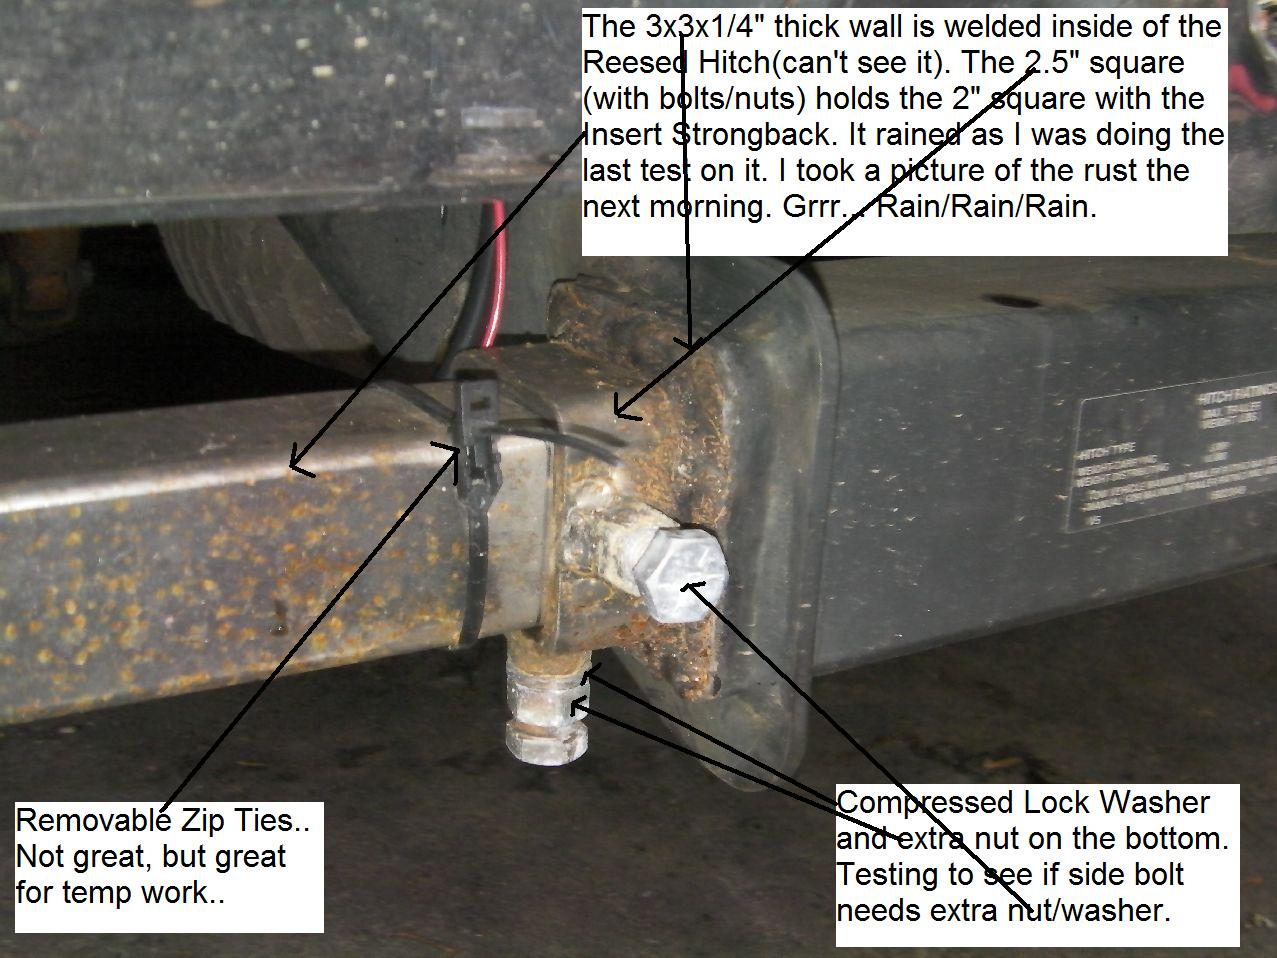
Outside diameter will be 3"x3" with a 3x3x1/4" thick wall Square
tube that is 4 inches long.
Inside of that will be a 2.5"x2.5" x 1/4" thick wall Square tube
that is 5 inches long.
The 3" piece will be welded inside of the Reesed hitch. The 2.5 welded
inside of the 3".
The bolts will go through the 2.5 inch in the area that is one inch longer than
the 3". This will give enough room to deal with the bolts, etc..
This part will be a permanent fixture of the truck hitch.
When I build the receiver, I will place a piece of flat bar on the back of the
reesed hitch insert that will stop the 2x2 thin wall antenna mount in the same
place each time, so the bolt and bolt hole will line up exactly.
When you install the antenna, you will slide it into the mount, bump the back
of the mount(flatbar), and screw the bolt through the 2" into the Inside
Strongback.
Then, you tighten down the bottom bolt and snug the whole mount down.
I put an extra nut and lock washer on the bolt for safe keeping. The second
nut and lock washer will keep the bolt from working loose.
I don't believe this is necessary on the side bolt, because it is a snug fit
into the hole in the 2" square. But, I added an extra nut without lock
washer for my first long trip (with lock washer in pocket) to see how it goes.
I should be able to put whatever torque I feel necessary on the bolts and not
worry about bending the 2x2 with the Strongback installed.
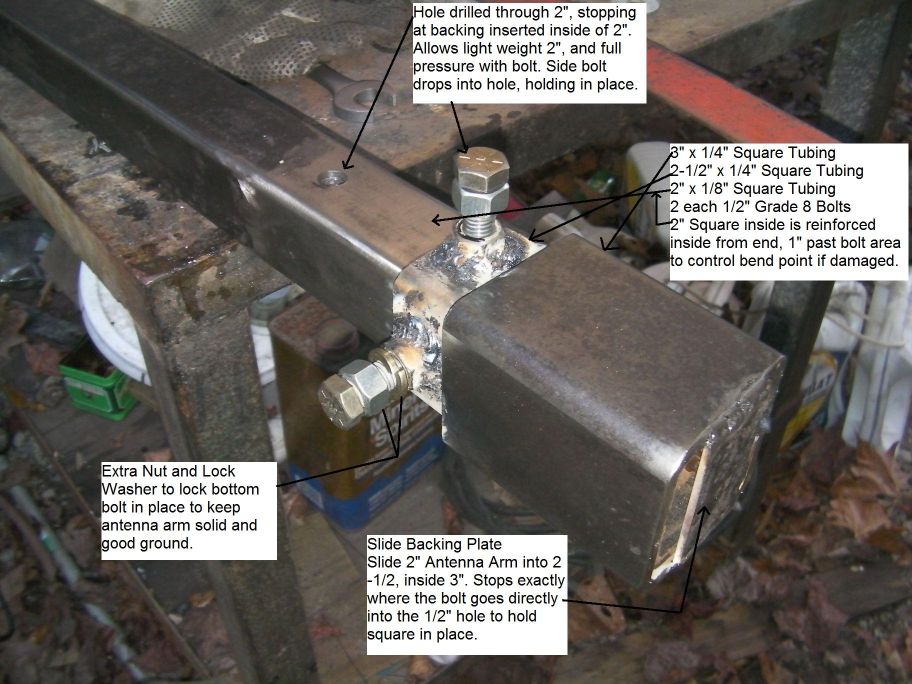
Here is another picture of the Receiver Insert:
What does it look like installed? How about installed just before a Rain? Raw
mild steel rusts pretty quick.. Here is what happened over night. No problem..
It comes right off with a wire wheel.. Only one problem.. I just got this done,
and I am off to Birmingham for a weekend.. I'll clean and paint it when I return..
BTW.. Beautiful weather the whole trip, and 10 Meters was wide open.. I was
grinning from ear to ear the whole trip there and back. Made a tail load of
contacts all over the world.. England, Brazil, Canary Islands just to name a
few. Seemed like everyone was in the truck with me.. I only keyed up 2 times
on a serious pileup to get an answer. All other contacts, even in pileups were
done on first key.. You can't have a good enough ground system, but this is
all that this antenna/truck combo needs... I'll test again after I clean it
up and prep it for a longer no-maintenance solution.
Here, I got the exact measurement out to the side of the truck. I wanted 5 inches
of clearance from the tail light diagonally. I also wanted to raise it up off
of the ground, to make sure I got good clearance from the ground plane and make
the antenna base/ground larger. I raised the antenna where I would be 2 inches
under 13 feet, fully extended for 80 meters. That put me approximately 33-1/2"
up from the ground to the base of the antenna. That means that I need a 15"
Riser.
This is pretty easy. Mount a piece of the thin wall 2" square tubing 90
degrees up to the other and weld it on. I left a stub sticking out past he riser,
just in the small case that someone might bump into it, before bumping into
the antenna riser. I capped of the riser to keep waster out of it, and capped
the end to close it off and keep the edges round and smooth.
I will be adding a riser to the riser to steady the antenna with a DX Engineering
Dxe-rsb-120000 Resin support Block Clamp for 2 Inch diameter pipes. The diameter
of the Alpine Screwdriver antenna.
I'll have to make the riser and mount to mount the resin block.
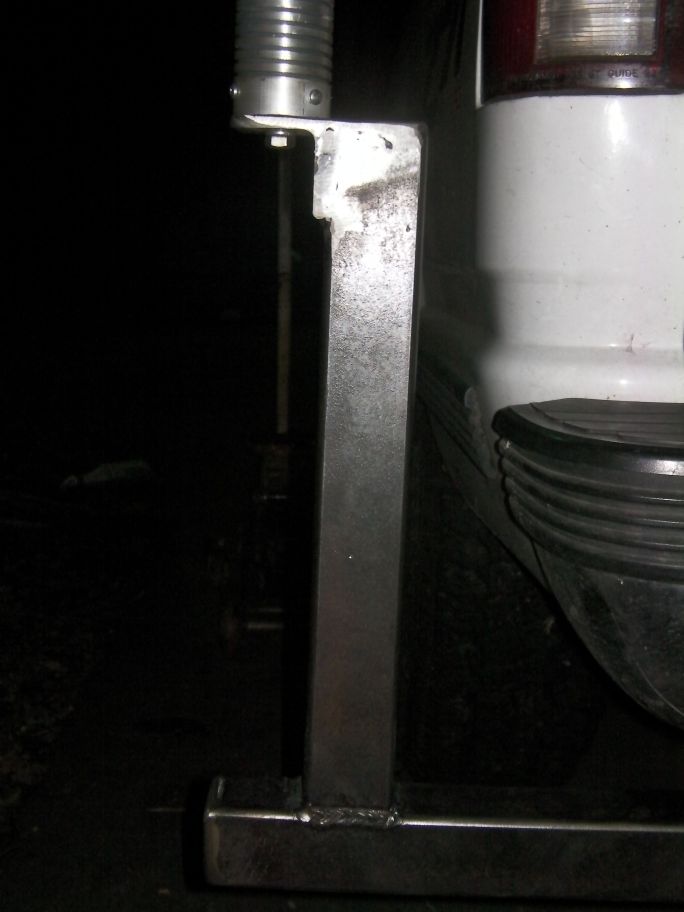
Now, this is mounted, the top is closed off, and I have added a 2x2x1/4"
piece of angle to mount the antenna.. The base of the 2" square is 1/2"
extended past the Antenna base.
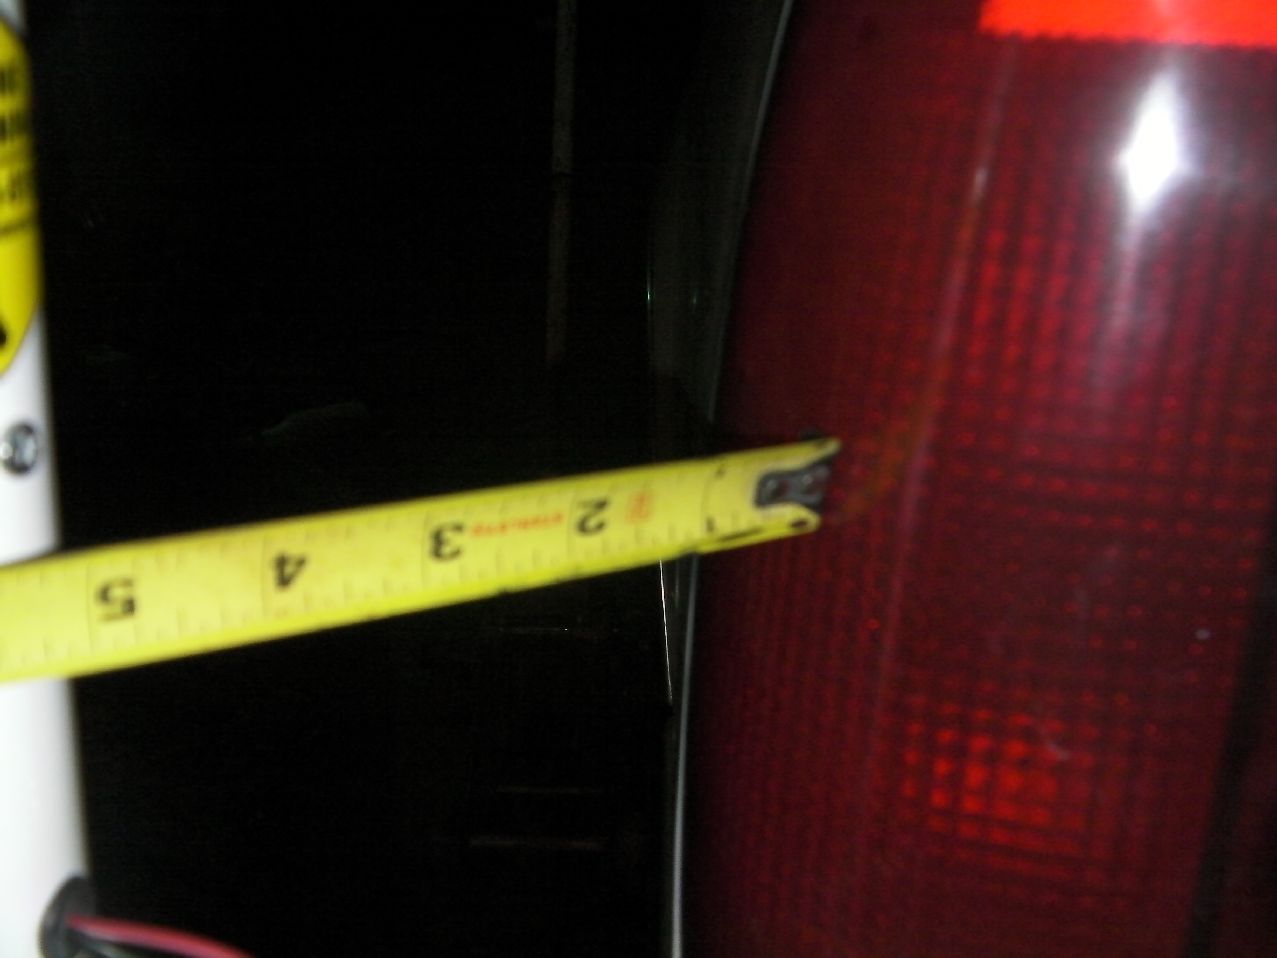
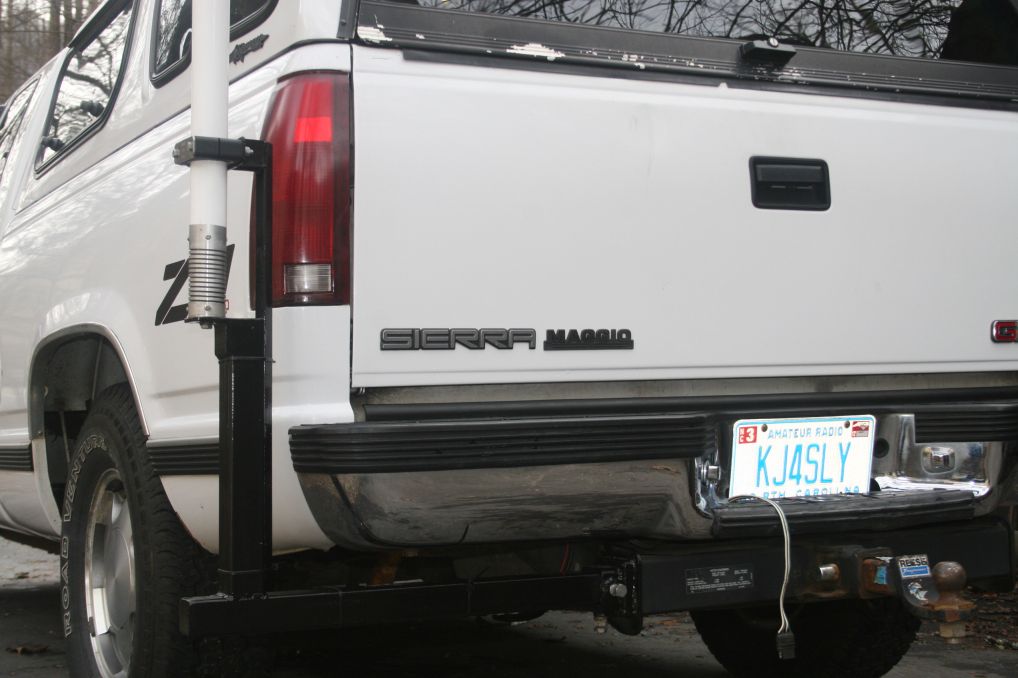
I got the 5 inches of diagonal distance from the Tail Light. About 4 inches
away from the side plane of the truck, but past the tailgate and past the side
of the truck.
Now, I have a day of no rain.. Lets finish this..
Here is the riser for the Antenna Resin Block Brace. It is 1" angle welded
to the 2" tubing riser. There is a piece of 1-1/2" square tube 1/16"
and a 1/8" piece of flat bar that the Resin block will bolt into. It has
a very slight amount of flex that will allow it to flex slightly, and reduce
the vibration and shock to the antenna on rough roads. Fully painted, this will
not cause any problems.
Here is the Riser for the Resin Block.
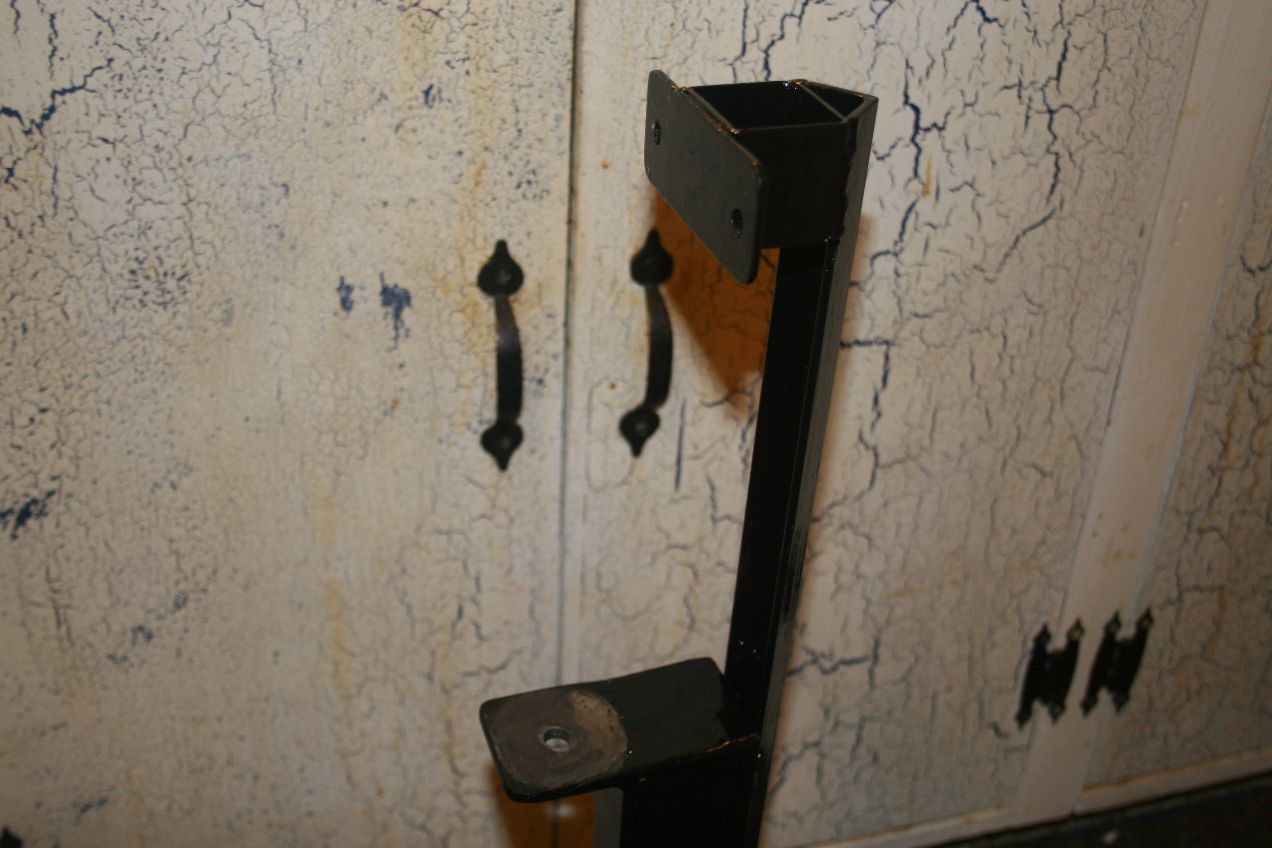
NOTE: Notice the round area on the base mounting plate for the antenna. No Paint..
I marked the area with a marking pencil and painted around it, overlapping the
line slightly. Later, after it is in its curing stage, I'll mount the antenna
temporarily, and cut around it with a sharp knife and scrape the paint back
off so I have a crisp line and a complete ground under the base of the antenna.
Here is a closer look:
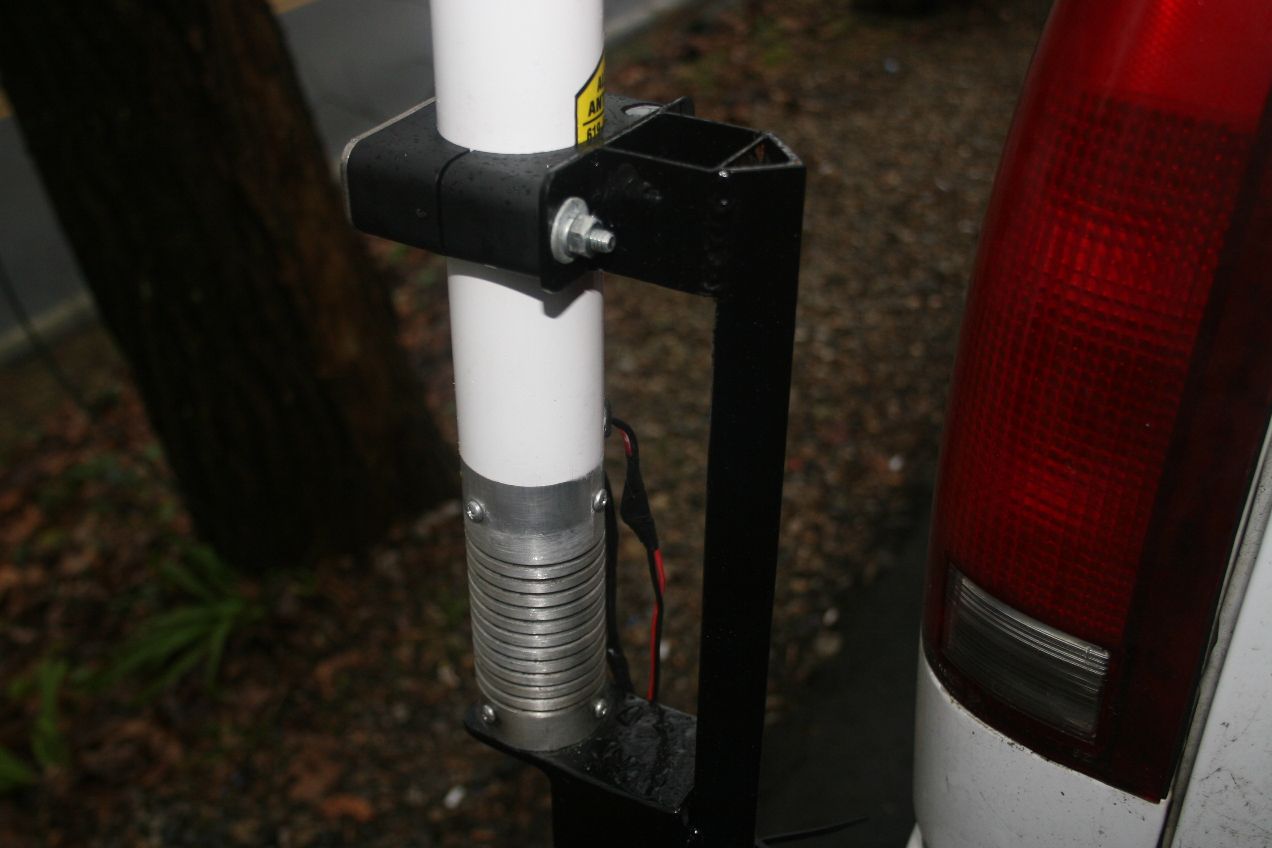
Oh.. BTW.. Notice the rain again? I just could not get lucky on this.. Forecast
was clear skies for 2 days.. Yea Right..
And,, I had to paint at night,, and then take the mount inside and hang it to
the side of the wood stove.. Black paint on bare metal is hard to paint, and
easy to miss spots.. I see I have a little touch up work to do.. No problem,
I like black for some reason, and end up painting at night frequently.. I usually
move it to better light, but, touch up in broad daylight works just as well.
It will get scratched somewhere else and need to be touched up later anyway..
One more:

Ok.. Now for the important things.. Grounds,, and good connections to the antenna.
The Coax Connection.. Most of you know how to do this.. For those who are not
sure, here you go. Measure the distance you need from screw to screw. Give yourself
a little extra and trim the sheath off. You can trim the center conductor later.
Make sure you don't cut the braid.. Once you strip the vinyl from the coax,
take something dull and smooth. Pick the braid out slowly. (Unbraid it). You
want to have a bunch of straight copper braid when you get finished. Now, you
have that, and you have the dielectric foam around the center conductor. Go
ahead and put it up to the antenna and get approximate bends and lengths.
Now, cut the braid copper to the correct length. Go ahead and tightly twist
and tin the braid. Insert it into a ring connector and solder the tinned copper
braid to the ring connector. If you don't feel good about your soldering, crimp
the connector. If you do, it is not needed. Now, make your final bend, and mount
it to the antenna temporarily. Get the exact length to the center conductor
screw. Now cut the end where you want it, tin, and solder on your second ring
connector. Check it for fit, and remove it carefully. Take some liquid electrical
tape and coat everything, including the ring terminals where the wire enters
and exits the crimp area. Coat the copper braid, the dielectric foam, and also
coat the edge of the cut vinyl where the braid starts. Keep Moisture out of
your cable as much as possible.
See the picture:

Notice the liquid electrical tape and the connections. No moisture will get
in here.. I cut the connectors that came on the antenna so I could move it further
down the mount. Those connections are soldered and liquid taped also.. My tape
job here is pretty bad, but, it was still sprinkling.. I'll re-tape it next
time they forecast rain and see what kind of weather I have. Ha... I have a
shed, but I have other projects in there.. Ha..One more Note: Now for the electrical
connections.. Notice the greased just to the top left of the bottom screw. It
was late, and I knew I would be pulling this off again for a final. Also raining
lightly.
This is a special grease.. A highly conductive grease. I hope it is as good
as everyone says it is. This is my first application, and I have applied it
to a bunch of other things to test while testing it on the antenna.
It is far better than typical tune up grease, dielectric grease, etc.. Also
is a picture of the Liquid Electrical Tape.
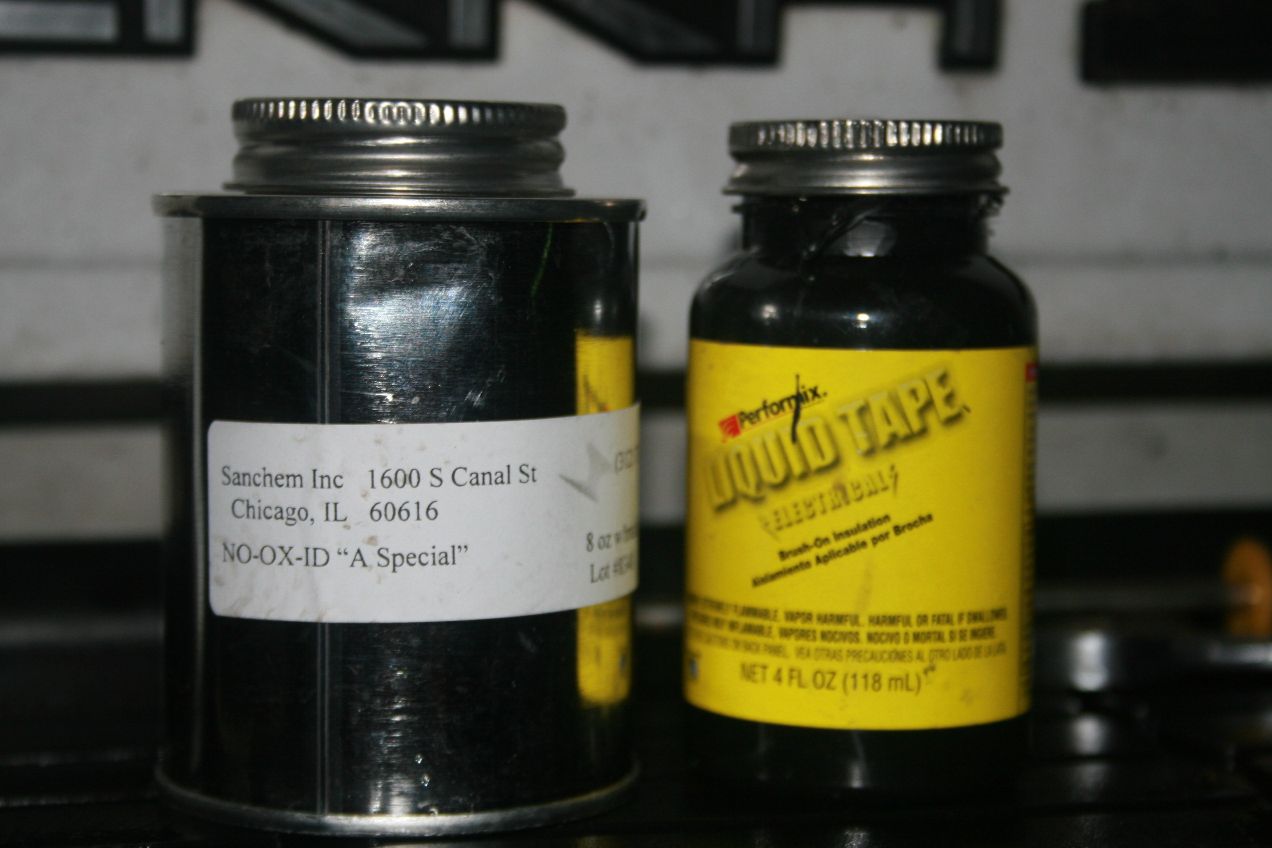
The NO-OX-ID "A Special" was applied in a thin coat on the bottom
of the antenna base, and rubbed into the bare metal on the antenna mount. Then,
you wipe it off and leave a thin coat on both surfaces.
The only other thing to apply the grease to is the end of the 2x2 light weight
antenna mount with the Strongback inserted, and the inside of the Reesed hitch
insert, after cleaning and buffing, using the same technique. I also put a dab
on the connectors of the 12v electric connections to the screw driver motor
of the antenna, and on the PL-259 and Female to Female SO-239 that I will use
to make the quick disconnect. The last job of the liquid tape will be protecting
the PL-259 and SO-239 connector that will stay on the truck. During my off season,
I will leave the antenna on the truck, and use the Liquid Electric tape on the
connection. It is easy enough to twist off, and leaves a pretty decent protection
on there even after it has been twisted off. During my season, there are too
many that can break a hammer, and I'm a little too busy to be on the radio much
anyway, and if I am running to town to pick up materials, I am on the phone
trying to tie up loose ends the whole trip anyway.. Oh well,, it pays the bills
and gives me time off to focus on things I enjoy, other than my company.
Lets look at the mount now.
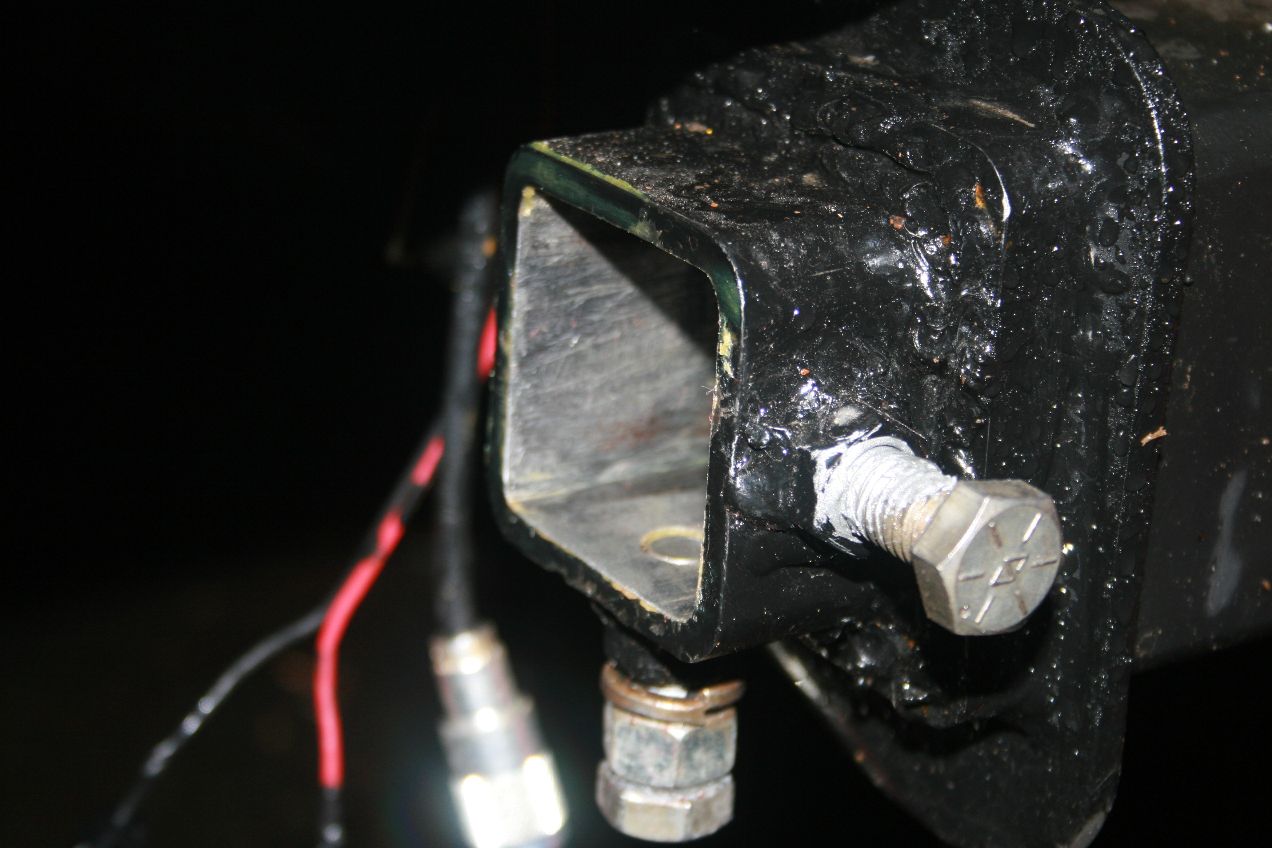
The receiver is ready to go. It has a light coat of the NO-OX-ID "A Special"
There is another type of grease on the bolt threads. I will wipe this of and
go with the NO-OX-ID there also. This silver anti seize is a mess when you get
it on you, and I am not dealing with high temps.. When I do the final install,
I will wipe the inside a bit cleaner. This NO-OX-ID gets into the pores of the
metal and stays there. Only a very thin coat is needed. I put it on thicker
than normal, and will wipe it (basically almost clean), before I do the final
install.
Now.. What am I going to do with the Cables when the Antenna and mount are not
on the truck. How do I keep the cables clean and keep the inside of the Reesed
hitch clean, and ready for a quick remount.
HERE GOES:
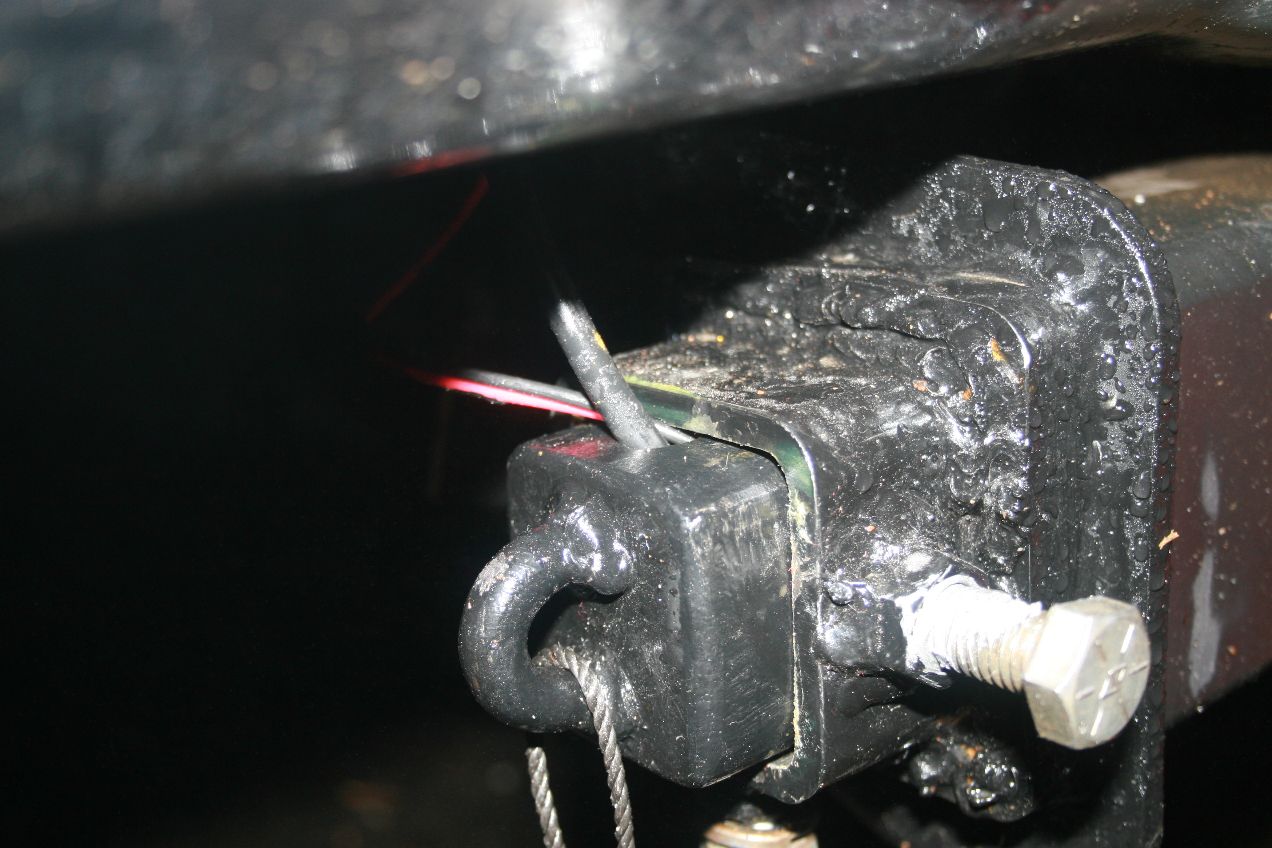
This is a 2x2 thin wall square tubing with the end closed up, and a half link
of chain added for a string. Hey,, when someone is driving behind me, I'm sure
the string and mount will be an area of interest for someone curious.. Maybe
I'll have a Variable Tone QSO in a parking lot somewhere and meet a new Ham..
Ha.. Ha... Well, maybe!! I'll keep it in a ziplock in the back of my truck since
it is treated with NO-OX-ID also. For the purpose of the picture, I put the
coax and 12volt cables on the top where you could see them. They will actually
enter the hitch under the mount, at the bottom. I rounded the edges of the Plug,
and went back and filed the edge of the insert later, after this picture. I'll
have to retouch the paint from painting at night anyway right?
I needed an easy way to insert the coax PL-259 and electrical connectors, and
a sure way to guarantee they would not slip out.. Here is what I came up with.
A teardrop tapered hole. When you push the plug in a little further, it tapers
down to the diameter of the RG-8X. I just pushed it in here and did not screw
it down.
Here is a better shot of the Plug.
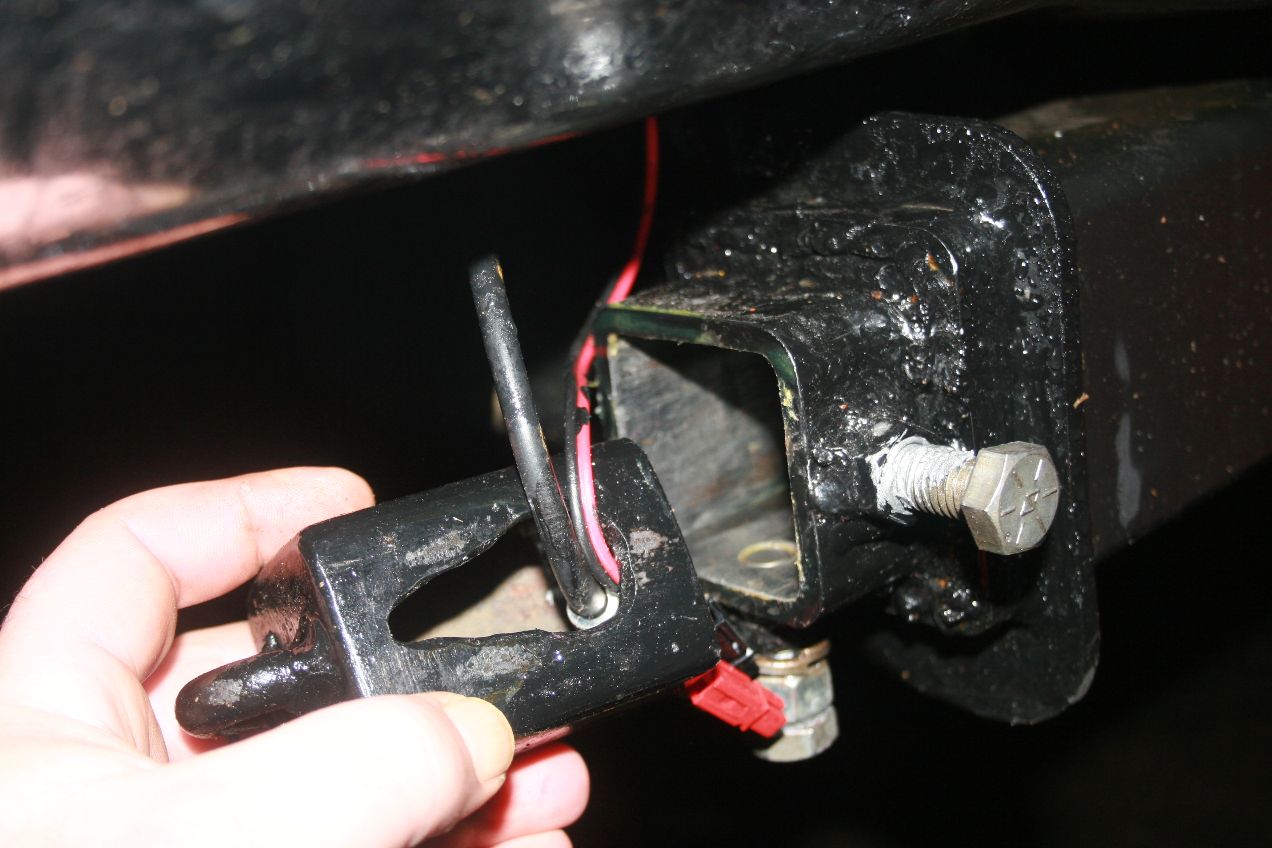
The Tear Drop hole gives me a quick way to stab the PL-259 in the hole with
the 12V Anderson connectors. When mounted with the cables pointing down, there
is not much room for anything to get into the reesed hitch area. I think it
will work fine. If not, I'll put a little extra grease around the edges.
Ok,, that just about takes care of it..
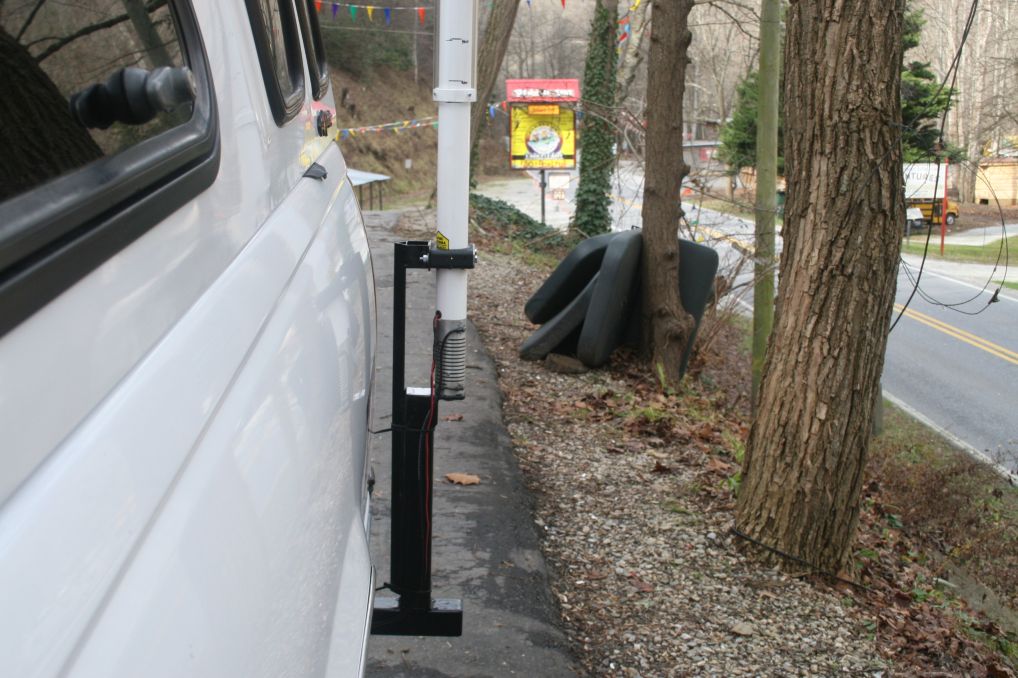
Now, lets see what it looks like.. It is 4 inches inside of the side view mirrors,
and comes out under the bumper. So it is about as protected as it can be.. I
am thinking about putting some of the truckers tape on he horizontal 2x2 square
tubing and some on the upright pieces just to make it show up in someone's tail
lights at night. On my next trip to town, I am going to pick some up and take
a look at it.
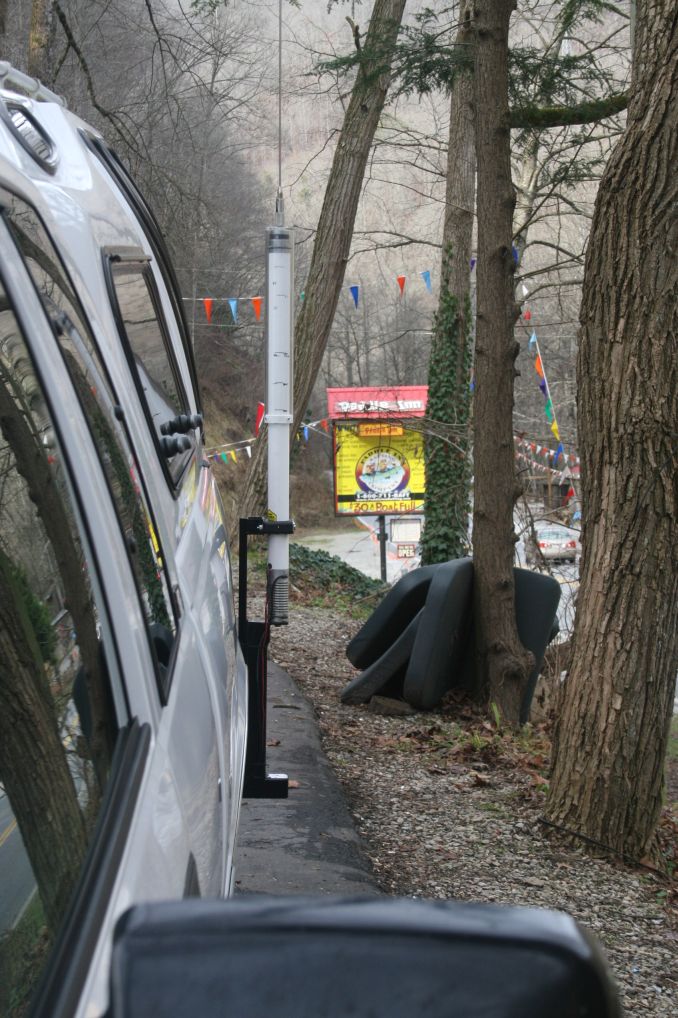
Here are some pictures of the truck with the antenna mounted.
THE FINISHED PRODUCT:
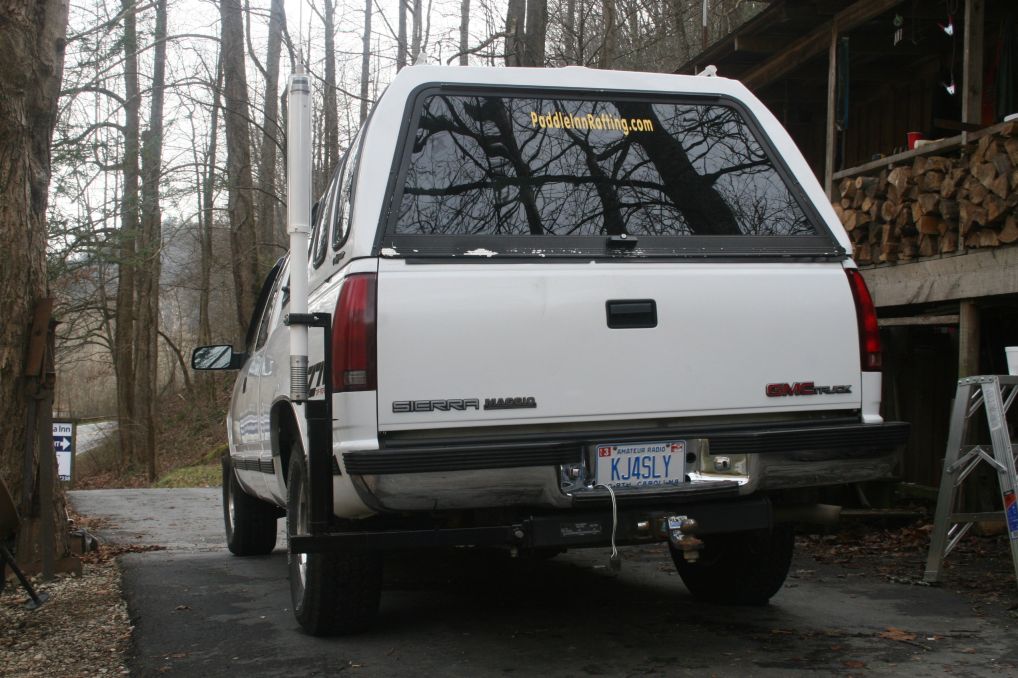
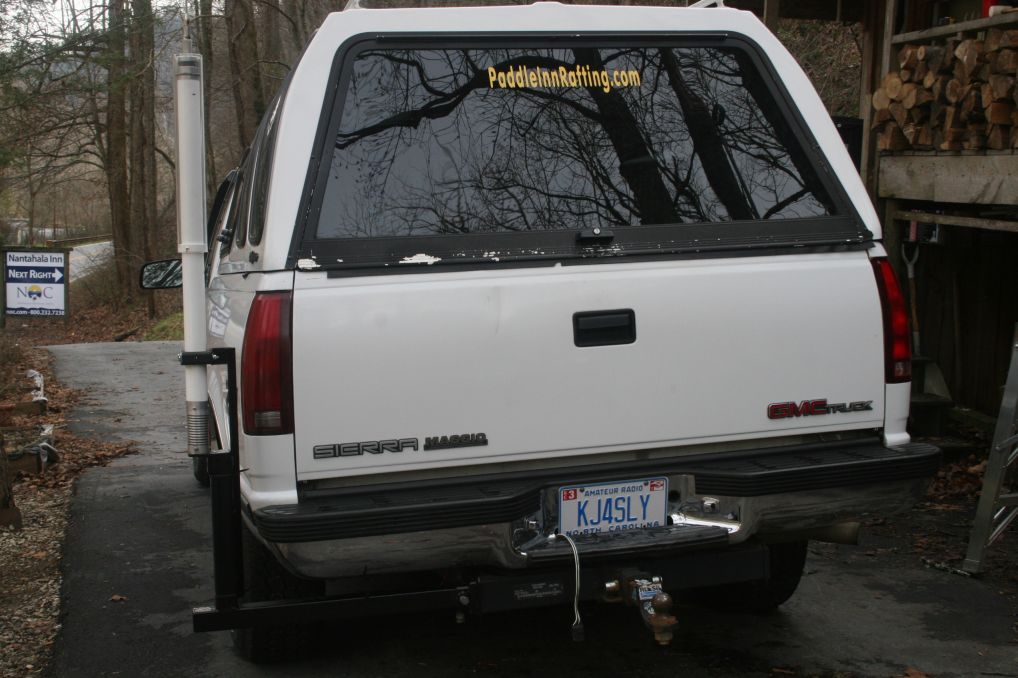
Ok... So you see in the background what I am up to during the "Season".
www.PaddleInnRaftng.com is my Company.
I own and operate a White Water Rafting Company on the Nantahala River 15 miles
West of Bryson City, NC. It is a great Company, and a lot of fun. I have 20
to 25 kids who work for me each Season. They are anything from Rich Spoiled
Momma's boys to hard core kids who have never had a pot to pee in.. We have
a pretty tight operation, so it takes quite a bit of effort to earn these guys
respect, and get them all to work together. Many of them work on the property,
and we have anything from Retired Lt Colonel's of the Air Force, to Software
Developers, to Masters and Doctorate Degreed professionals, to Ex-Convicts and
College Kids who have never had a job before.
Employees are the worst part of the deal, and then again the best part of the
deal..
The Customers are great. All here to have a good time, and drop some of their
disposable income.
There is much less of that going around since our beloved President and Corrupt
Congress is doing his best to destroy what little Freedom and Economic Wealth
we have left.
A landslide election didn't seem to make much of a difference, but at least,
no one party has control, so at least they are slowed down a bit now. The daily
barrage against our Freedoms was a bit hard for any Red Blooded American to
bear. If next Election does not do it, I can sure see History repeating itself..
I think another Citizen Revolution will be inevitable, but I have been wrong
before.
Hope you like the idea. I am sure you can come up with something that might
fit you better on your build. I was trying to figure out how to build this with
what I had around the house, verses driving to the metal shop and store that
is at least 40 minutes away in either direction.
I'll be making a trip here in a few days December 26, 2011 to Montgomeryville,
PA. Eleven hours or so in the truck.. We'll see what this new mount will do.
When I first installed it,, WOW.. I expect similar results.
73's and Good Luck.. If you have any questions, look me up on QRZ..
Mark Thomas (KJ4SLY).. I'll have a 1x2 or 2x1 Callsign in a couple of weeks.